Wednesday, December 31, 2014

Google Drives Excel to PDF conversion with Bangla font

Linux:

  1. Download the excel file as a "word5.ods" format.
  2. Open it and it will show the lines as hazardous. So give it border. If you select all and give border, it looks fine.
  3. Now select the columns which you want to print.
  4. File → Page Preview → then select the bar how you want to print it.(3 columns :word, word meaning, synonym)
  5. Select the columns(above 3 columns)
  6. File → Export as PDF... → Select “Selection” from “Range” of “General” part → Then press the “Export” button.
  7. Enjoy!!!

    Another Procedure: 

    Change the row height to fit the contents

    1. Select the row or rows that you want to change.
    2. On the Home tab, in the Cells group, click Format.
      On the Home tab, click Format
    3. Under Cell Size, click AutoFit Row Height.
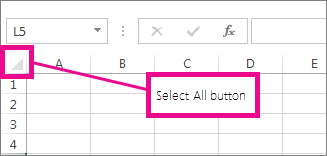
      Tip    To quickly autofit all rows on the worksheet, click the Select All button, and then double-click the boundary below one of the row headings.
    Select All button

    Collected From: https://support.office.com/en-au/article/Change-the-column-width-and-row-height-db30658d-0c0b-44ad-825f-55f1cb4d9957

Friday, December 19, 2014

PostgreSQL JDBC connection JAVA example code

PostgreSQL JDBC connection JAVA example code

<!-- JDBCExample.java -->

package com.rizvi.HibernateTestPackage;

import java.sql.Connection;
import java.sql.DriverManager;
import java.sql.ResultSet;
import java.sql.SQLException;
import java.sql.Statement;

public class JDBCExample {

    public static void main(String[] args) {
        // TODO Auto-generated method stub
        System.out.println("-------- PostgreSQL "
                + "JDBC Connection Testing ------------");

        try {

            Class.forName("org.postgresql.Driver");

        } catch (ClassNotFoundException e) {

            System.out.println("Where is your PostgreSQL JDBC Driver? "
                    + "Include in your library path!");
            e.printStackTrace();
            return;

        }

        System.out.println("PostgreSQL JDBC Driver Registered!");

        Connection connection = null;

        try {

            connection = DriverManager.getConnection(
                    "jdbc:postgresql://localhost:5432/postgres", "postgres",
                    "postgres");

        } catch (SQLException e) {

            System.out.println("Connection Failed! Check output console");
            e.printStackTrace();
            return;

        }

        if (connection != null) {
            System.out.println("You made it, take control your database now!");
        } else {
            System.out.println("Failed to make connection!");
        }

           Connection c = null;
           Statement stmt = null;
           try {
           Class.forName("org.postgresql.Driver");
             c = DriverManager
                .getConnection("jdbc:postgresql://localhost:5432/postgres",
                "postgres", "postgres");
             c.setAutoCommit(false);
             System.out.println("Opened database successfully");

             stmt = c.createStatement();
             ResultSet rs = stmt.executeQuery( "SELECT * FROM USERLIST;" );
             while ( rs.next() ) {
                int id = rs.getInt("ID");
                String  name = rs.getString("NAME");
                int age  = rs.getInt("AGE");
                String birth = rs.getString("BIRTH");
              
                System.out.println( "ID = " + id );
                System.out.println( "NAME = " + name );
                System.out.println( "AGE = " + age );
                System.out.println( "BIRTH = " + birth );
                System.out.println();
             }
             rs.close();
             stmt.close();
             c.close();
           } catch ( Exception e ) {
             System.err.println( e.getClass().getName()+": "+ e.getMessage() );
             System.exit(0);
           }
           System.out.println("Operation done successfully");
         }
   }

Monday, December 15, 2014

Multiple JDBC Connector file's path set to UBUNTU(Mysql, PostgreSQL)

Multiple JDBC Connector file's path set to UBUNTU(Mysql, PostgreSQL)

For Mysql,
http://zakirrizvi.blogspot.jp/2014/12/mysql-path-set-in-ubuntu.html
or
https://help.ubuntu.com/community/JDBCAndMySQL

For PostgreSQL,
  1. install PostgreSQL
  2. download PostgreSQL's JDBC connector file. Put it in a location(/usr/share/java/) of your computer /usr/share/java/postgresql-9.0-802.jdbc4.jar
Run the command
$ sudo gedit .bashrc

Add this portion:

CLASSPATH=.:/usr/share/java/postgresql-9.0-802.jdbc4.jar
export CLASSPATH
CLASSPATH=$CLASSPATH:/usr/share/java/mysql.jar
export CLASSPATH 

 Check it now:
$ echo $CLASSPATH
.:/usr/share/java/postgresql-9.0-802.jdbc4.jar:/usr/share/java/mysql.jar

N.B:
It is not possible to set multiple connector file in classpath if you want to set in 
 /etc/environment file.
You must have to set it in .bashrc file.
Well wishes to all.

Copy source to destination in ubuntu

$ sudo cp -a Source_Folder Destination_Folder
or
$ sudo cp -R Source_Folder Destination_Folder
 
The -a flag turns on recursive behaviour (which can also be done with the -R flag),
and will also attempt to preserve metadata such as file ownership, permissions, timestamps, links, etc. 

MySQL path set in UBUNTU

MySQL path set in ubuntu:

https://help.ubuntu.com/community/JDBCAndMySQL

First, run this 3 commands:

$ sudo apt-get install mysql-server
$ sudo apt-get install mysql-client
$ sudo apt-get install libmysql-java
 
Then , set up MySQL default password:

$ mysqladmin -u root password root
$ mysql -u root -p 
 
After that, Create SQL database and tables

mysql> create database emotherearth;

Setting up the user to use JDBC

you can set it for all users, by editing /etc/environment  
(use sudo command - $ sudo gedit /etc/environment

CLASSPATH=".:/usr/share/java/mysql.jar"
 
Log out and Log in again. Start up a terminal and type: 

$ echo $CLASSPATH
 
It should print out something like ":/usr/share/java/mysql.jar"

Testing a java program.

It should now work.

import java.sql.*;
import java.util.Properties;

public class DBTestDemo
{
  // The JDBC Connector Class.
  private static final String dbClassName = "com.mysql.jdbc.Driver";

  // Connection string. macanova is the database the program
  // is connecting to. You can include user and password after this
  // by adding (say) ?user=rizvi&password=rizvi123. Not recommended!

  private static final String CONNECTION = "jdbc:mysql://127.0.0.1/macanova";

  public static void main(String[] args) throws ClassNotFoundException,SQLException
  {
    System.out.println(dbClassName);
    // Class.forName(xxx) loads the jdbc classes and
    // creates a drivermanager class factory
    Class.forName(dbClassName);

    // Properties for user and password. Here the user rizvi and password rizvi123
    Properties p = new Properties();
    p.put("user","rizvi");
    p.put("password","rizvi123");

    // Now try to connect
    Connection c = DriverManager.getConnection(CONNECTION,p);

    System.out.println("It works !");
    c.close();
    }
}

bitbucket: Images for linkup

1. Input page


2. Give input


3. After submission


4. Html view


5. Xml view


6. Json view

7. Validation:


Wednesday, December 10, 2014

How to import a Java project to Eclipse?

How to import a Java project to Eclipse?
or
Copy Java Project for new Change in Eclipse of Ubuntu:

workspace:
1. First copy the Project "Terasoluna" from workspace.
2. Then Paste it into same workspace which make a folder like "Terasoluna(copy)".
3. Rename it "TerasolunaDB" from "Terasoluna(copy)".

Eclipse:
4. Create a New Java Project named by "TerasolunaDB".
5. It will get the workspace's "TerasolunaDB" project details.
6. Then Finish it and enjoy!!


Collected from: http://stackoverflow.com/questions/11983088/how-to-import-a-java-project-to-eclipse

Clearing the disk Cache:Ubuntu

Clearing the disk cache

For experimentation, it's very convenient to be able to drop the disk cache. For this, we can use the special file /proc/sys/vm/drop_caches. By writing 3 to it, we can clear most of the disk cache:
$ free -m
                    total       used       free     shared    buffers     cached
Mem:          1504       1471         33              0           36           801
-/+ buffers/cache:        633        871
Swap:         2047             6      2041

$ echo 3 | sudo tee /proc/sys/vm/drop_caches 
3

$ free -m
                    total       used       free     shared    buffers     cached
Mem:          1504        763        741              0             0           134
-/+ buffers/cache:       629        875
Swap:         2047            6      2041

Notice how "buffers" and "cached" went down, free mem went up, and free+buffers/cache stayed the same.      

Collected from: http://www.linuxatemyram.com/play.html

Tuesday, November 18, 2014

Cross-Compilation Example


Cross-Compilation Example

The following example uses javac to compile code that will run on a 1.6 VM.
$ javac -source 1.6 -target 1.6
-bootclasspath /usr/local/java/jdk1.6.0_32/jre/lib/rt.jar -extdirs ""
*.java

The -source 1.6 option specifies that version 1.6 (or 6) of the Java programming language be used to compile OldCode.java. The option -target 1.6 option ensures that the generated class files will be compatible with 1.6 VMs. Note that in most cases, the value of the -target option is the value of the -source option; in this example, you can omit the -target option.
You must specify the -bootclasspath option to specify the correct version of the bootstrap classes (the rt.jar library). If not, the compiler generates a warning:
$ javac -source 1.6 *.java
warning: [options]
bootstrap class path not set in conjunction with -source 1.6
If you do not specify the correct version of bootstrap classes, the compiler will use the old language rules (in this example, it will use version 1.6 of the Java programming language) combined with the new bootstrap classes, which can result in class files that do not work on the older platform (in this case, Java SE 6) because reference to non-existent methods can get included.

Exception in thread "main" java.lang.UnsupportedClassVersionError: AdapterTest : Unsupported major.minor version 51.0


Exception in thread "main" java.lang.UnsupportedClassVersionError: AdapterTest : Unsupported major.minor version 51.0

Description and Solving:
First check the javac and java version:

rizvi@rizvi-pc:~/Desktop/Adapter$ javac -version
javac 1.7.0_65
rizvi@rizvi-pc:~/Desktop/Adapter$ java -version
java version "1.6.0_32"
Java(TM) SE Runtime Environment (build 1.6.0_32-b05)
Java HotSpot(TM) 64-Bit Server VM (build 20.7-b02, mixed mode)
rizvi@rizvi-pc:~/Desktop/Adapter$

So, a higher JDK version  is used to compile the source file and  a lower JDK version is used to run the program.
But its important to note is that vice-versa is not true "you can compile your program in J2SE 1.4 and run on J2SE 1.5 and you will not get any UnSupportedClassVersionError". When a higher JDK is used for compilation it creates class file with higher version and when a lower JDK is used to run the program it found that higher version of class file not supported at JVM level and results in java.lang.UnsupportedClassVersionError.

First solution:

The version number "major.minor version 51.0" show which Java was used to run eclipse.
51.0
= Java J2SE 7
To fix your problem you should try to run eclise with Java 7. This can be done by updating your Java configuration:
sudo update-alternatives --config java
Then select a Java 7 version and retry.
If Java 7 isn't installed you can get it with apt-get:
sudo apt-get install default-jdk

------------------------------------------------------------------------------

Second Solution:

http://crunchify.com/exception-in-thread-main-java-lang-unsupportedclassversionerror-comcrunchifymain-unsupported-major-minor-version-51-0/

------------------------------------------------------------------------------

Third Solution: 

Java Cross-compilation:
rizvi@rizvi-pc:~/Desktop/Adapter$ javac -target 1.6 -source 1.6 -bootclasspath /usr/local/java/jdk1.6.0_32/jre/lib/rt.jar *.java

Here,
target and source must be same.
rizvi@rizvi-pc:~/Desktop/Adapter$ java AdapterTest;
Area
= 100
rizvi@rizvi-pc:~/Desktop/Adapter$

Thursday, September 18, 2014

Compare RESTful vs SOAP Web Services

SOAP vs REST Web Services
There are many differences between SOAP and REST web services. The important 10 differences between SOAP and REST are given below:

No.
SOAP
REST
1)
SOAP is a protocol.
REST is an architectural style.
2)
SOAP stands for Simple Object Access Protocol.
REST stands for REpresentational State Transfer.
3)
SOAP can't use REST because it is a protocol.
REST can use SOAP web services because it is a concept and can use any protocol like HTTP, SOAP.
4)
SOAP uses services interfaces to expose the business logic.
REST uses URI to expose business logic.
5)
JAX-WS is the java API for SOAP web services.
JAX-RS is the java API for RESTful web services.
6)
SOAP defines standards to be strictly followed.
REST does not define too much standards like SOAP.
7)
SOAP requires more bandwidth and resource than REST.
REST requires less bandwidth and resource than SOAP.
8)
SOAP defines its own security.
RESTful web services inherits security measures from the underlying transport.
9)
SOAP permits XML data format only.
REST permits different data format such as Plain text, HTML, XML, JSON etc.
10)
SOAP is less preferred than REST.
REST more preferred than SOAP.


 Compare RESTful vs SOAP Web Services
There are currently two schools of thought in developing Web Services – one being the standards-based traditional approach [ SOAP ] and the other, simpler school of thought [ REST ].
This article quickly compares one with the other -


REST
SOAP
Assumes a point-to-point communication model–not usable for distributed computing environment where message may go through one or more intermediaries
Designed to handle distributed computing environments
Minimal tooling/middleware is necessary. Only HTTP support is required
Requires significant tooling/middleware support
URL typically references the resource being accessed/deleted/updated
The content of the message typically decides the operation e.g. doc-literal services
Not reliable – HTTP DELETE can return OK status even if a resource is not deleted
Reliable
Formal description standards not in widespread use. WSDL 1.2, WADL are candidates.
Well defined mechanism for describing the interface e.g. WSDL+XSD, WS-Policy
Better suited for point-to-point or where the intermediary does not play a significant role
Well suited for intermediated services
No constraints on the payload
Payload must comply with the SOAP schema
Only the most well established standards apply e.g. HTTP, SSL. No established standards for other aspects.  DELETE and PUT methods often disabled by firewalls, leads to security complexity.
A large number of supporting standards for security, reliability, transactions.
Built-in error handling (faults)
No error handling
Tied to the HTTP transport model
Both SMTP and HTTP are valid application layer protocols used as Transport for SOAP
Less verbose
More verbose

Wall Paper Change in Ubuntu


Short description of programs for your choose:
  • Walch: (sudo apt-get install wallch) very simple, for those, who just want only program for wallpaper change.
  • DesktopNova: (sudo apt-get install desktopnova) - similiar to Walch, little more advanced, but you'll not find in it for example settings of image sizing.
  • Variety: (sudo add-apt-repository ppa:peterlevi/ppa && sudo apt-get update && sudo apt-get install variety) - it's advanced wallpaper changer, with all features you'd want from wallpaper changer (sizing, auto-downloading, effects etc.). Just for those, who want something more from wallpaper changer.

JavaScript Compressor


Title: JavaScript Compressor


From Website:

Or,
First make a folder and keep all files:
  1. yuicompressor-2.4.2.jar
  2.  compiler.jar
  3.  input file(yui-min.js)
Then go to folder path using cd command.

cd ..../yourFolder/

Then follow these 2 command.

java -jar compiler.jar --js yui-min.js --js_output_file yui-min.js.closure.js

java -jar yuicompressor-2.4.2.jar yui-min.js -o yui-min.js.ycomp.js --charset utf-8

What is a foreign key?

What is a foreign key?
A foreign key means that values in one table must also appear in another table.
The referenced table is called the parent table while the table with the foreign key is called the child table. The foreign key in the child table will generally reference a primary key in the parent table.
A foreign key can be defined in either a CREATE TABLE statement or an ALTER TABLE statement.
Using a CREATE TABLE statement
The syntax for creating a foreign key using a CREATE TABLE statement is:
CREATE TABLE table_name
(
column1 datatype null/not null,
column2 datatype null/not null,
...

CONSTRAINT fk_column
FOREIGN KEY (column1, column2, ... column_n)
REFERENCES parent_table (column1, column2, ... column_n)
);
For Example
CREATE TABLE supplier
( supplier_id numeric(10) not null,
supplier_name varchar2(50) not null,
contact_name varchar2(50),
CONSTRAINT supplier_pk PRIMARY KEY (supplier_id)
);

CREATE TABLE products
( product_id numeric(10) not null,
supplier_id numeric(10) not null,
CONSTRAINT fk_supplier
FOREIGN KEY (supplier_id)
REFERENCES supplier(supplier_id)
);
In this example, we've created a primary key on the supplier table called supplier_pk. It consists of only one field - the supplier_id field. Then we've created a foreign key called fk_supplier on the products table that references the supplier table based on the supplier_id field.
We could also create a foreign key with more than one field as in the example below:
CREATE TABLE supplier<
( supplier_id numeric(10) not null,
supplier_name varchar2(50) not null,
contact_name varchar2(50),
CONSTRAINT supplier_pk PRIMARY KEY (supplier_id, supplier_name)
);

CREATE TABLE products
( product_id numeric(10) not null,
supplier_id numeric(10) not null,
supplier_name varchar2(50) not null,
CONSTRAINT fk_supplier_comp
FOREIGN KEY (supplier_id, supplier_name)
REFERENCES supplier(supplier_id, supplier_name)
);
In this example, our foreign key called fk_foreign_comp references the supplier table based on two fields - the supplier_id and supplier_name fields.
Using an ALTER TABLE statement
The syntax for creating a foreign key in an ALTER TABLE statement is:
ALTER TABLE table_name
add CONSTRAINT constraint_name
FOREIGN KEY (column1, column2, ... column_n)
REFERENCES parent_table (column1, column2, ... column_n);
For Example
ALTER TABLE products
add CONSTRAINT fk_supplier
FOREIGN KEY (supplier_id)
REFERENCES supplier(supplier_id);
In this example, we've created a foreign key called fk_supplier that references the supplier table based on the supplier_id field.
We could also create a foreign key with more than one field as in the example below:
ALTER TABLE products
add CONSTRAINT fk_supplier
FOREIGN KEY (supplier_id, supplier_name)
REFERENCES supplier(supplier_id, supplier_name);


Others: Department and Students Table

create table department
(dept_id numeric(10) not null,
dept_name varchar2(30) not null,
constraint department_pk primary key(dept_id)
); 
 
create table students
(std_id numeric(10) not null,
std_name varchar2(30) not null,
dept_id numeric(10) not null,
constraint student_pk primary key(std_id),
constraint fk_department
foreign key (dept_id)
references department(dept_id)
);

Remove file, folder and lock of folder using linux command


Title : Remove file, folder and lock of folder using linux command

How to remove all files from a folder(folder name=eclipse) ?
sudo rm -rf eclipse/*

How to remove a folder (folder name = eclipse)?
sudo rm -rf eclipse

Install Java update version from this page.

Uninstall Java from ubuntu

Install eclipse

For removing lock of a folder or file access(I want to access all files from the folder named by .ssh)
sudo chmod -R 777 /home/pdm-rizvi/.ssh/