Wednesday, December 31, 2014

Google Drives Excel to PDF conversion with Bangla font

Linux:

  1. Download the excel file as a "word5.ods" format.
  2. Open it and it will show the lines as hazardous. So give it border. If you select all and give border, it looks fine.
  3. Now select the columns which you want to print.
  4. File → Page Preview → then select the bar how you want to print it.(3 columns :word, word meaning, synonym)
  5. Select the columns(above 3 columns)
  6. File → Export as PDF... → Select “Selection” from “Range” of “General” part → Then press the “Export” button.
  7. Enjoy!!!

    Another Procedure: 

    Change the row height to fit the contents

    1. Select the row or rows that you want to change.
    2. On the Home tab, in the Cells group, click Format.
      On the Home tab, click Format
    3. Under Cell Size, click AutoFit Row Height.
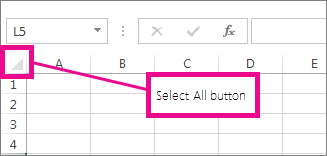
      Tip    To quickly autofit all rows on the worksheet, click the Select All button, and then double-click the boundary below one of the row headings.
    Select All button

    Collected From: https://support.office.com/en-au/article/Change-the-column-width-and-row-height-db30658d-0c0b-44ad-825f-55f1cb4d9957

Friday, December 19, 2014

PostgreSQL JDBC connection JAVA example code

PostgreSQL JDBC connection JAVA example code

<!-- JDBCExample.java -->

package com.rizvi.HibernateTestPackage;

import java.sql.Connection;
import java.sql.DriverManager;
import java.sql.ResultSet;
import java.sql.SQLException;
import java.sql.Statement;

public class JDBCExample {

    public static void main(String[] args) {
        // TODO Auto-generated method stub
        System.out.println("-------- PostgreSQL "
                + "JDBC Connection Testing ------------");

        try {

            Class.forName("org.postgresql.Driver");

        } catch (ClassNotFoundException e) {

            System.out.println("Where is your PostgreSQL JDBC Driver? "
                    + "Include in your library path!");
            e.printStackTrace();
            return;

        }

        System.out.println("PostgreSQL JDBC Driver Registered!");

        Connection connection = null;

        try {

            connection = DriverManager.getConnection(
                    "jdbc:postgresql://localhost:5432/postgres", "postgres",
                    "postgres");

        } catch (SQLException e) {

            System.out.println("Connection Failed! Check output console");
            e.printStackTrace();
            return;

        }

        if (connection != null) {
            System.out.println("You made it, take control your database now!");
        } else {
            System.out.println("Failed to make connection!");
        }

           Connection c = null;
           Statement stmt = null;
           try {
           Class.forName("org.postgresql.Driver");
             c = DriverManager
                .getConnection("jdbc:postgresql://localhost:5432/postgres",
                "postgres", "postgres");
             c.setAutoCommit(false);
             System.out.println("Opened database successfully");

             stmt = c.createStatement();
             ResultSet rs = stmt.executeQuery( "SELECT * FROM USERLIST;" );
             while ( rs.next() ) {
                int id = rs.getInt("ID");
                String  name = rs.getString("NAME");
                int age  = rs.getInt("AGE");
                String birth = rs.getString("BIRTH");
              
                System.out.println( "ID = " + id );
                System.out.println( "NAME = " + name );
                System.out.println( "AGE = " + age );
                System.out.println( "BIRTH = " + birth );
                System.out.println();
             }
             rs.close();
             stmt.close();
             c.close();
           } catch ( Exception e ) {
             System.err.println( e.getClass().getName()+": "+ e.getMessage() );
             System.exit(0);
           }
           System.out.println("Operation done successfully");
         }
   }

Monday, December 15, 2014

Multiple JDBC Connector file's path set to UBUNTU(Mysql, PostgreSQL)

Multiple JDBC Connector file's path set to UBUNTU(Mysql, PostgreSQL)

For Mysql,
http://zakirrizvi.blogspot.jp/2014/12/mysql-path-set-in-ubuntu.html
or
https://help.ubuntu.com/community/JDBCAndMySQL

For PostgreSQL,
  1. install PostgreSQL
  2. download PostgreSQL's JDBC connector file. Put it in a location(/usr/share/java/) of your computer /usr/share/java/postgresql-9.0-802.jdbc4.jar
Run the command
$ sudo gedit .bashrc

Add this portion:

CLASSPATH=.:/usr/share/java/postgresql-9.0-802.jdbc4.jar
export CLASSPATH
CLASSPATH=$CLASSPATH:/usr/share/java/mysql.jar
export CLASSPATH 

 Check it now:
$ echo $CLASSPATH
.:/usr/share/java/postgresql-9.0-802.jdbc4.jar:/usr/share/java/mysql.jar

N.B:
It is not possible to set multiple connector file in classpath if you want to set in 
 /etc/environment file.
You must have to set it in .bashrc file.
Well wishes to all.

Copy source to destination in ubuntu

$ sudo cp -a Source_Folder Destination_Folder
or
$ sudo cp -R Source_Folder Destination_Folder
 
The -a flag turns on recursive behaviour (which can also be done with the -R flag),
and will also attempt to preserve metadata such as file ownership, permissions, timestamps, links, etc. 

MySQL path set in UBUNTU

MySQL path set in ubuntu:

https://help.ubuntu.com/community/JDBCAndMySQL

First, run this 3 commands:

$ sudo apt-get install mysql-server
$ sudo apt-get install mysql-client
$ sudo apt-get install libmysql-java
 
Then , set up MySQL default password:

$ mysqladmin -u root password root
$ mysql -u root -p 
 
After that, Create SQL database and tables

mysql> create database emotherearth;

Setting up the user to use JDBC

you can set it for all users, by editing /etc/environment  
(use sudo command - $ sudo gedit /etc/environment

CLASSPATH=".:/usr/share/java/mysql.jar"
 
Log out and Log in again. Start up a terminal and type: 

$ echo $CLASSPATH
 
It should print out something like ":/usr/share/java/mysql.jar"

Testing a java program.

It should now work.

import java.sql.*;
import java.util.Properties;

public class DBTestDemo
{
  // The JDBC Connector Class.
  private static final String dbClassName = "com.mysql.jdbc.Driver";

  // Connection string. macanova is the database the program
  // is connecting to. You can include user and password after this
  // by adding (say) ?user=rizvi&password=rizvi123. Not recommended!

  private static final String CONNECTION = "jdbc:mysql://127.0.0.1/macanova";

  public static void main(String[] args) throws ClassNotFoundException,SQLException
  {
    System.out.println(dbClassName);
    // Class.forName(xxx) loads the jdbc classes and
    // creates a drivermanager class factory
    Class.forName(dbClassName);

    // Properties for user and password. Here the user rizvi and password rizvi123
    Properties p = new Properties();
    p.put("user","rizvi");
    p.put("password","rizvi123");

    // Now try to connect
    Connection c = DriverManager.getConnection(CONNECTION,p);

    System.out.println("It works !");
    c.close();
    }
}

bitbucket: Images for linkup

1. Input page


2. Give input


3. After submission


4. Html view


5. Xml view


6. Json view

7. Validation:


Wednesday, December 10, 2014

How to import a Java project to Eclipse?

How to import a Java project to Eclipse?
or
Copy Java Project for new Change in Eclipse of Ubuntu:

workspace:
1. First copy the Project "Terasoluna" from workspace.
2. Then Paste it into same workspace which make a folder like "Terasoluna(copy)".
3. Rename it "TerasolunaDB" from "Terasoluna(copy)".

Eclipse:
4. Create a New Java Project named by "TerasolunaDB".
5. It will get the workspace's "TerasolunaDB" project details.
6. Then Finish it and enjoy!!


Collected from: http://stackoverflow.com/questions/11983088/how-to-import-a-java-project-to-eclipse

Clearing the disk Cache:Ubuntu

Clearing the disk cache

For experimentation, it's very convenient to be able to drop the disk cache. For this, we can use the special file /proc/sys/vm/drop_caches. By writing 3 to it, we can clear most of the disk cache:
$ free -m
                    total       used       free     shared    buffers     cached
Mem:          1504       1471         33              0           36           801
-/+ buffers/cache:        633        871
Swap:         2047             6      2041

$ echo 3 | sudo tee /proc/sys/vm/drop_caches 
3

$ free -m
                    total       used       free     shared    buffers     cached
Mem:          1504        763        741              0             0           134
-/+ buffers/cache:       629        875
Swap:         2047            6      2041

Notice how "buffers" and "cached" went down, free mem went up, and free+buffers/cache stayed the same.      

Collected from: http://www.linuxatemyram.com/play.html